To install Windows Server 2022 on your KVM server, you need to go through a few important steps. This guide will show you how to do it easily and quickly. All you need to do is enable the ISO feature, activate VNC, and prepare the ISO installation. After that, the installation of Windows Server 2022 can begin smoothly!
Note: This guide may look very long and might be intimidating. However, we have documented every single step to ensure you won’t face any unexpected surprises.
Enable ISO Feature
To use the ISO feature in the web interface, you first need to activate it in the settings.

- Click on „Miscellaneous“ in the left menu
- Then open „VCP Settings“
- Go to the „Expert Functions“ tab
- Set the „Enable ISO Upload for KVM Server“ setting to „Enabled“.
A new menu entry will now appear in the navigation of your servers that are compatible with the ISO functionality, called the ISO Installer.
Activate VNC
To manually install your server later, you will need a VNC connection. This can be done easily through the browser.
- Open the cloud manager of the server where you want to install Windows.
- Click on „VPS Settings“ in the action panel
- Open the tab named „VNC“.
- Enable VNC if it is not already enabled. You will need to stop and restart the server for the VNC functionality to be activated, allowing you to access the installation via the browser.
- Close the window and stop the server. Wait patiently until the server is fully shut down.
- Restart the server. Wait patiently until the process is complete. The system needs some time to configure VNC.
Prepare ISO Installation
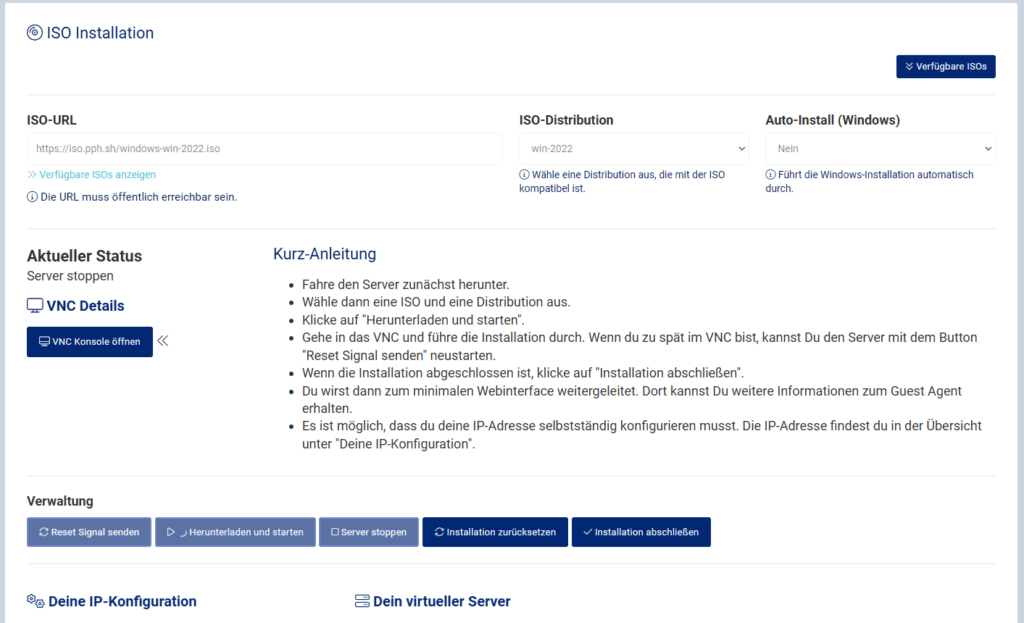
Now it’s time to open the ISO Installer. Click on the corresponding menu entry.
Then let the web interface load all the data. Here you will see all the information about installing with an ISO disk.

- Shut down the server via the action buttons in the ISO Installer if it is still online.
- The ISO URL field will now be activated. Click on „Show Available ISOs“ to select a predefined ISO. We have provided many ISOs for you. However, you can also enter your own URL. This must be publicly available.
- For Windows Server 2022, open „Windows“ and select Windows Server 2022.
- You can choose a suitable distribution in the ISO Distribution list, but „win“ is sufficient here.
- When you are ready, click on „Download and Start“. The process may take a short while. You can monitor the status live.
- Wait until the status switches to „ISO ready, installation can start“.
- Now connect to the NoVNC web console by clicking on „Open VNC Console“.
- If the Windows Installer does not start, you can send a reset (executed in 3 seconds) by clicking „Send Reset Signal“. Sometimes the installation starts only when any key is pressed at startup.
Install Windows Server 2022
Now you are in the Windows Server Setup.

- Select the desired language, time zone, and keyboard layout.
- Click on Next.
- Click on „Install Now“
- Wait for the setup to start.
Choose Operating System to Install

- Now select the operating system. In most cases, you will want to install „Windows Server 2022 Standard Evaluation (Desktop Experience)“. This is the second entry. Select this one.
- Click on Next.
Accept License Terms
- Accept the Microsoft Software License Terms by checking the box.
- Click on Next.
Select Installation Type
- Click on „Custom: Install Microsoft Server Operating System only“ (2nd entry).

Select Disk for Installation
You now need to load a driver so that Windows can recognize the virtual disks. We have already inserted a virtual DVD with the appropriate drivers into your server.
- Click on „Load Driver“.
- Click on „Browse“.
- Find the CD drive „vz-tools-win“ and navigate to
- CD:\viostor\2k22\amd64
- Click on „OK“.

Windows will now load the necessary drivers.
- There should now be an entry for „Virtuozzo VirtIO SCSI controller“.
- Click on „Next“.
- Let Windows load the driver.
- The drives should now be recognized.
- Select each drive once and click „Delete“. This will remove the old operating system (Linux or Windows) from the server.
- Select the remaining drive and click on „Next“.
- Now Windows Server 2022 will be installed.

Wait patiently for this process to complete. The time it takes depends on the number of CPU cores. Windows will restart after the process is complete.
Prepare Windows

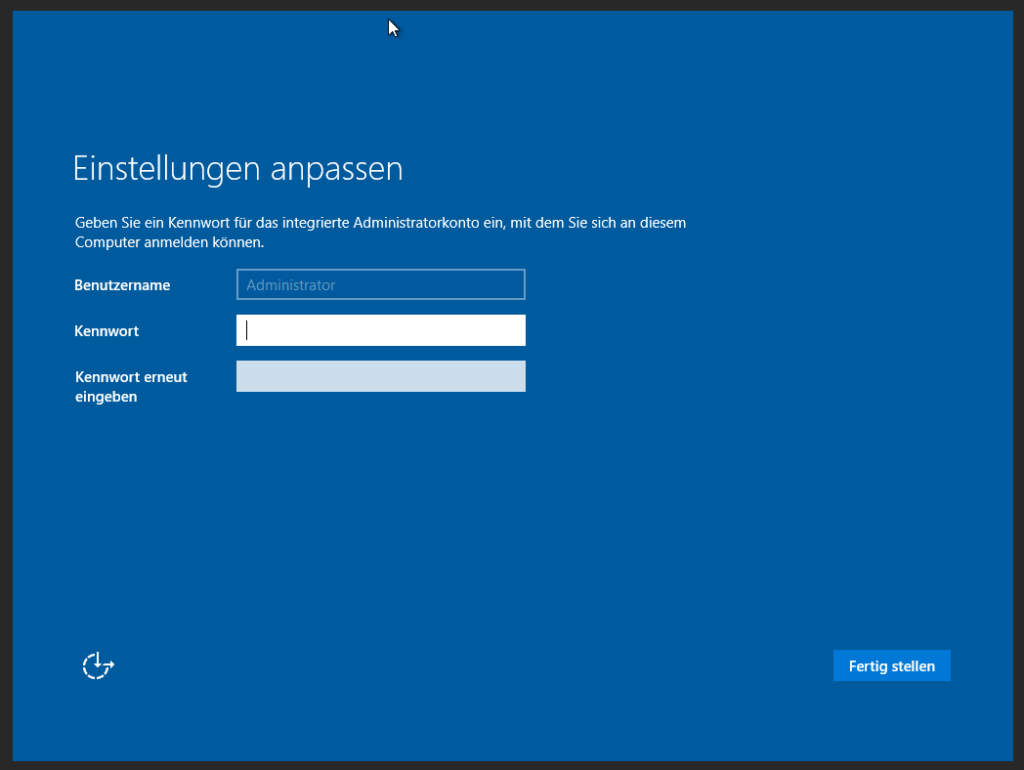
Windows has now booted from the disk.
- Enter your desired administrator password.
- Repeat your Windows password.
- Confirm by pressing „Enter“ or clicking on „Finish“.
First Login
We are not quite done with the preparation yet. You need to log in via VNC once and enable RDP.
- Send a CTRL+ALT+DELETE signal to the server via VNC to access the login screen. You can find this option in the left menu panel of your VNC browser session.
- Log in with the administrator password you set earlier.

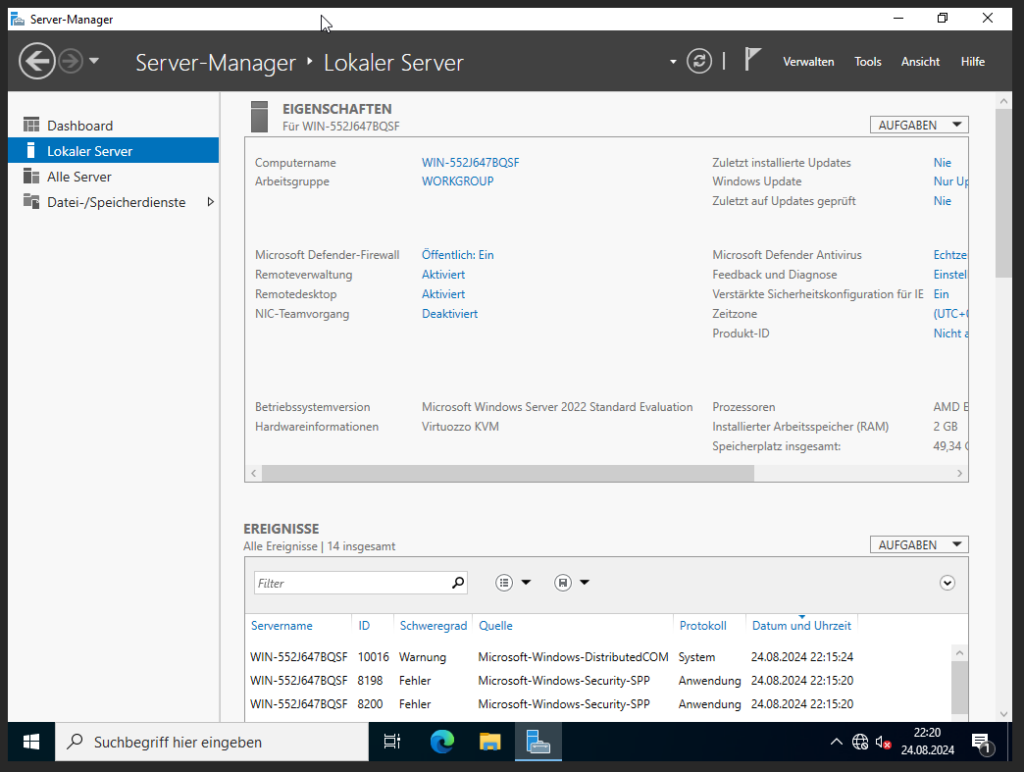
Wait for Windows to start the Server Manager.
Enable Remote Desktop
- In the Windows Server Manager, click on „Local Server“
- Click on „Disabled“ next to „Remote Desktop“.
- In the dialog that opens, select „Allow remote connections to this computer“.
- Confirm the following information by clicking „OK“.
- Uncheck „Require Network Level Authentication“ (directly below).
- Click „Apply“, then „OK“.
- Click on the „Refresh“ icon at the top of the Server Manager to ensure that Remote Desktop is now enabled.

Configure Network
Final Step: Install Network Drivers
To actually connect to your server now, Windows of course needs a network connection. By default, the drivers for the virtual network card are not installed. But once again, the included driver DVD will help.
- Right-click on the Start button in the bottom left.
- Select „Device Manager“.
- Double-click on the entry with a warning triangle named „Ethernet Controller“.
- In the dialog that opens, click on „Update Driver“.
- Click on „Browse my computer for drivers“.
- Click on „Browse“.
- Again, search for the drive „Virtuozzo Tools“. Here you only need to select the drive.
- Make sure „Include subfolders“ is selected.
- Click on „Next“.
- Wait for Windows to install the network driver.
- If Windows asks if the PC should be discoverable by other computers on the network, make sure to click „No“!
Complete ISO Installation
Now go back to the web interface and click on „Complete Installation“ in the ISO Manager. The server will now be stopped one last time, the ISO will be removed, and the server will then be restarted.
You have now installed Windows and can connect to your server via Remote Desktop!
